DTC P1112 Intake Air Temperature
(IAT) Sensor Circuit Intermittent Low Voltage

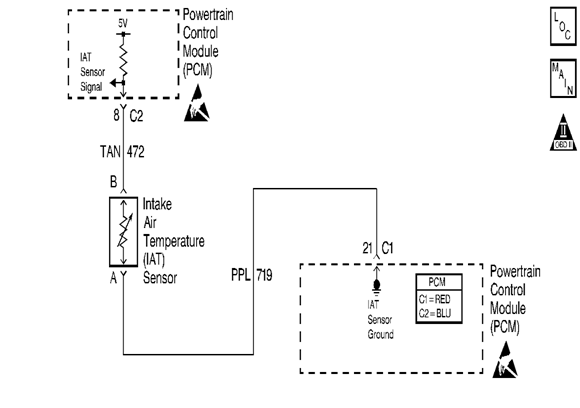
The Intake Air
Temperature (IAT) sensor contains a semiconductor device which changes
resistance based on temperature (a thermistor). The
IAT sensor mounts in the air intake passage of the engine air induction system.
The IAT sensor has a signal circuit and a ground circuit. The PCM applies a
voltage (about 5.0 volts) on the signal circuit to the sensor. The PCM monitors
changes in this voltage caused by changes in the resistance of the sensor in
order to determine the intake air temperature.
When the intake air is
cold, the sensor (thermistor) resistance is high, and
the PCMs signal voltage is only pulled down a small amount through the sensor
to ground. The PCM senses a high signal voltage (low temperature). When the
intake air is warm, the sensor resistance is low, and the signal voltage is
pulled down a greater amount. This causes the PCM to sense a low signal voltage
(high temperature).
When the PCM senses a
signal voltage lower than the normal operating range of the sensor, this DTC
sets.
Conditions
for Running the DTC
- DTCs P0102, P0103, P0117, P0118,
P0500, P0502, P0503 are not set.
- The engine run is greater than 30
seconds.
- The vehicle speed is greater than
40 km/h (25 mph).
Conditions
for Setting the DTC
- The intake air temperature is
greater than 139°C (282°F).
- All conditions exist for 0.3 second.
Action
Taken When the DTC Sets
- The PCM stores the DTC information
into memory when the diagnostic runs and fails.
- The malfunction indicator lamp (MIL)
will not illuminate.
- The PCM records the operating
conditions at the time the diagnostic fails. The PCM stores this
information in the Failure Records.
Conditions
for Clearing the DTC
- A last test failed, or current DTC,
clears when the diagnostic runs and does not fail.
- A history DTC will clear after
40 consecutive warm-up cycles, if no failures are reported by this or
any other non-emission related diagnostic.
- Use a scan tool in order to clear
the DTC.
If the engine sat overnight,
the engine coolant temperature and intake air temperature values should display
within a few degrees of each other. If the temperatures are not within 3°C
(5°F), refer to Temperature vs Resistance .
For an intermittent,
refer to Symptoms
.
The numbers below refer
to the step numbers on the diagnostic table.
- When moving related
connectors, visually/physically inspect connectors for the following:
- Poor
mating of the connector halves or a terminal not fully seated in the
connector body (backed out).
- Improperly
formed or damaged terminals. Carefully reform or replace all connector
terminals in the related circuits in order to insure proper terminal
contact tension.
- Poor
terminal to wire connection. Inspect for poor crimps, crimping over wire
insulation rather than the wire.
- Dirt
or corrosion on the terminals. Inspect for missing connector seals and
for damage to the connector seals.
- When moving the
related wiring harnesses, visually/physically inspect the wiring for the
following:
- Wire
insulation that is rubbed through, causing an intermittent short.
- Wiring
broken inside the insulation.
- Using the Freeze
Frame and/or Failure Records data may aid in locating an intermittent
condition. If you cannot duplicate the DTC, the information included in
the Freeze Frame and/or Failure Records data can help determine how many
miles since the DTC set. The Fail Counter and Pass Counter can also help
determine how many ignition cycles the diagnostic reported a pass and/or a
fail. Operate the vehicle within the same freeze frame conditions (RPM,
load, vehicle speed, temperature etc.) that you observed. This will
isolate when the DTC failed. For any test that requires probing the PCM or
component harness connectors, use the Connector Test Adapter Kit J 35616-A .
Using this kit prevents any damage to the harness connector terminals.
|
Step |
Action |
Value(s) |
Yes |
No |
|
Did
you perform the Powertrain On-Board Diagnostic
(OBD) System Check? |
-- |
|||
|
Did
DTC P0112 also set? |
-- |
Go to DTC
P0112 Intake Air Temperature (IAT) Sensor Circuit Low Voltage |
||
Does
the sensor value change abruptly while a related connector is being moved? |
-- |
|||
|
Observe
the affected sensor value on a scan tool while moving the related wiring
harnesses. Does the sensor value change abruptly while moving the related
electrical harnesses? |
-- |
|||
Does
the scan tool indicate that this diagnostic failed this ignition? |
-- |
Go to Diagnostic Aids |
||
|
Repair
the damage connectors/terminals following the Repair Procedures in Connector
Repairs in Wiring Systems Is the action complete? |
-- |
-- |
||
|
Repair
the faulty wiring. Refer to Wiring
Repairs in Wiring Systems. Is the action complete? |
-- |
-- |
||
Is
the action complete? |
-- |
-- |
||
Does
the scan tool indicate that this test ran and passed? |
-- |
|||
|
Select
the Capture Info option and the Review Info option using the scan tool. Does
the scan tool display any DTCs that you have not diagnosed? |
-- |
Go to the applicable
DTC table |
System OK |